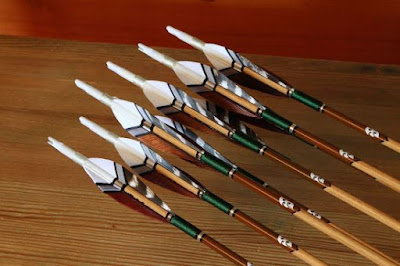
Arrow Glossary

The following glossary is not comprehensive. Indeed there are many more types of arrowheads, fletches, shafts and specialty nocks used for arrows that aren't listed here. Eg. Lighted LED nocks.

Arrow: A projectile used with a bow, consisting of a shaft with a pointed tip on one end and stabilizing feathers or vanes on the other.

Barbed Point: An arrowhead with barbs on its edges, designed to prevent easy removal from the target. Barbed points are often used in bowfishing.

Blunt Point or Bludgeon Point: A rounded or flat tip designed for hunting small game or birds. Blunt points will still kill a small target through blunt force.

Bodkin Point: A type of arrowhead characterized by a narrow, pointed tip. Bodkin points were historically used to penetrate armor or thick hides.

Broadhead: An arrowhead with wide blades designed for hunting. Broadheads have sharp cutting edges that cause significant damage to the target upon impact. They come in various designs, including fixed-blade and expandable-blade types.

Cock Fletch/Vane: Also known as the Rooster or Index fletch, it is a fletching that is coloured differently from the others to indicate the correct orientation when nocking the arrow.

Cresting: Decorative markings or designs applied to the shaft of an arrow. Cresting is often used for identification or aesthetic purposes.

Cresting Paint: Specialized paint used to apply decorative markings, designs, or patterns on the arrow shaft. Cresting paint is often durable and resistant to wear and tear.

Cresting Wheel: A rotating device used to apply cresting paint to the arrow shaft. The wheel allows for precise and consistent application of markings or designs.

Feather: Traditionally, arrows were fletched with feathers, usually from birds like turkeys. Feathers provide stability and can be either natural or synthetic.

Field Point: Also known as a bullet point or practice point, it is a simple conical tip used primarily for practice and target shooting. It is usually made of metal and has a smooth surface. Field points help prevent damage to targets.

Fletching: The feathers or vanes attached to the rear end of the arrow shaft, responsible for stabilizing the arrow's flight. Fletching helps to minimize drag and maintain accuracy.

Fletching Jig: A device used to position and attach fletching to arrow shafts. The jig ensures consistent placement and angles for optimal arrow flight.

Fletchings Orientation: Refers to the positioning of the feathers or vanes on an arrow shaft. The orientation can be helical (twisted) or straight, affecting arrow stability and spin.

Fletching Tape/Adhesive: The tape or adhesive used to secure the fletching to the arrow shaft. It can be in the form of double-sided tape, glue, or specialized adhesive.

Flu-Flu: A specialized type of fletching with large, full-length feathers or vanes. Flu-flu arrows are designed to slow down quickly and are easy to find, making them suitable for aerial target shooting or hunting birds in the woods. Flu Flu fletching is often brightly coloured (eg. bright yellow) in order to make them easy to find.

Insert: A component inserted into the front end of the arrow shaft, typically made of aluminum or other metal. Inserts provide a threaded connection for screw-in arrowheads and enhance durability.

Judo Point: A specialized arrowhead used for small game hunting. It features spring-loaded arms or wire prongs that prevent the arrow from burying too deep into the ground or vegetation.

Nock: A slot or groove at the rear end of the arrow, designed to engage with the bowstring, allowing the arrow to be properly positioned and released.

Nock Collar: A protective ring or sleeve placed around the rear end of the arrow shaft, near the nock. The nock collar adds strength and durability to the arrow and helps prevent damage.

Point/Tip: The front end of the arrow that pierces the target. Various types of arrowheads exist, each serving different purposes.

Screw-In Point: A type of arrowhead that can be screwed into the arrow shaft, allowing for easy replacement or customization of the point type for specific tasks.

Shaft: The main body of the arrow, typically made of materials like wood, carbon fiber, aluminum, or a combination.

Spine: The stiffness of an arrow shaft, usually measured in deflection or spine value. The spine affects how the arrow flexes during flight and interacts with the bow.

Vane: Modern arrows often use plastic vanes instead of feathers. Vanes are typically made of materials like plastic or rubber and offer improved durability and consistency.

Whistling Arrowheads: Arrowheads with holes cut within them and a hollow interior that make a loud whistling noise when shot. Tibetan and Mongolian archers also used howling arrowheads / howling broadheads, which had the added benefit of demoralizing the enemy in addition to wounding/killing them.

Wrap: A decorative tape or shrinkable tube applied to the arrow shaft. Wraps can feature designs, patterns, or personalization and provide additional protection to the shaft.

Javelin as a Sport, Part 2

Back in June a father asked me about getting javelin lessons for his son, which is not one of the sports that I specialize in. I did write about the topic however back in 2016. See Javelin as a Sport.

Here's the response I gave him:

Hello!


That is not one of the sports I specialize in, but I do remember writing an article with a personal anecdote on the subject.

I recommend going to some track and field events where javelin is one of the sports featured and try talking to any coaches there about the possibility of lessons.

Otherwise there are YouTube videos on the subject and you could purchase javelins for him to practice with and find a safe place (possibly a football or soccer field) to practice.

If you're unable to find anyone else to help him I am still a sports trainer and can assist in his training, but I still recommend finding someone who specializes in teaching javelin.

Have a great day!

Sincerely,
Charles Moffat
CardioTrek.ca

After the father thanked me it occurred to me that there was one tool at my fingertips that could also provide a good answer, so I went to ChatGPT and asked the following question:

What are the best ways to learn how to do Javelin as a sport?

And here was the response:

If you're interested in learning how to do javelin as a sport, there are several effective ways to get started and improve your skills. Here are some steps you can take:

  1. Find a coach or join a club: Look for local athletic clubs or organizations that offer javelin training. Having a qualified coach can make a significant difference in your learning process, as they can provide guidance, correct your technique, and help you progress.

  2. Study proper technique: Javelin throwing involves a specific set of techniques and skills. Familiarize yourself with the fundamentals by studying instructional videos, books, or online resources. Pay attention to grip, approach, body positioning, and the throwing motion.

  3. Warm up and stretch: Like any physical activity, warming up before throwing javelin is crucial. Perform dynamic stretches and mobility exercises to prepare your muscles and joints for the activity.

  4. Start with basic drills: Begin with drills that focus on individual aspects of the throw, such as footwork, arm movement, and balance. These drills will help you develop muscle memory and refine your technique.

  5. Work on strength and conditioning: Javelin throwing requires power, speed, and explosiveness. Incorporate strength and conditioning exercises into your training routine to improve your overall athletic performance. Focus on exercises that target the core, shoulders, legs, and hips.

  6. Practice regularly: Consistency is key when learning any sport. Set aside regular practice sessions to work on your technique, drills, and conditioning. Gradually increase the intensity and duration of your training as you progress.

  7. Attend workshops and camps: Look for workshops, clinics, or camps specifically focused on javelin throwing. These events often feature experienced coaches and athletes who can provide valuable insights, feedback, and specialized training.

  8. Participate in competitions: Once you've developed a solid foundation and feel confident in your abilities, consider entering local or regional javelin competitions. Competing will give you valuable experience, expose you to different conditions, and help you gauge your progress.

  9. Seek feedback and analyze performance: Ask your coach or fellow athletes to provide feedback on your technique. Recording and reviewing your throws can also help you identify areas for improvement and track your progress over time.

  10. Stay motivated and set goals: Javelin throwing requires dedication and perseverance. Set short-term and long-term goals to keep yourself motivated and focused on improving. Celebrate your achievements along the way, and remember that progress takes time.

Remember to prioritize safety throughout your training, and if you have any pre-existing health conditions or concerns, consult with a medical professional before engaging in any vigorous physical activity.


I then emailed the AI's response to the father. Answers like that make me realize that certain professions are doomed to be replaced by AI.


Why the Waist-to-Height Ratio (WHtR) is an Indicator of Obesity and Overall Health

There is a ratio called the Waist-to-Height Ratio (WHtR) that is used as an indicator of obesity and overall health. It is calculated by dividing your waist circumference by your height. The WHtR is considered to be a better indicator of health risks associated with obesity than the more commonly used body mass index (BMI) in some cases.

The problem with BMI is that it ignores muscle mass and bone density, by which standard even Arnold Schwarzenegger in his prime would have been considered obese because of the added muscle and bone weight. Thus BMI isn't actually a good indicator of obesity.

The Waist-to-Height Ratio (WHtR) however is a good indicator.

To calculate your waist-to-height ratio, follow these steps:

  1. Measure your waist circumference: Use a measuring tape to measure the circumference of your waist at the narrowest point, typically around the belly button.

  2. Measure your height: Use a measuring tape or a wall-mounted height scale to measure your height in either centimeters (cm) or meters (m).

  3. Divide your waist circumference by your height: Divide your waist circumference by your height. Make sure to use the same units for both measurements (e.g., if your waist circumference is in centimeters, convert your height to centimeters as well).

For example, if your waist circumference is 80 cm and your height is 170 cm, the calculation would be: 80 cm / 170 cm = 0.47.

The resulting number is your waist-to-height ratio. The general guideline is that a ratio below 0.5 is considered healthy, while a ratio above 0.5 indicates an increased risk of health problems associated with obesity.

Note that having a lot of abdominal muscles (eg. a robust six pack) could also skew the results of the WHtR, but this would be an extreme rarity. Likewise someone who is pregnant should ignore their waist-to-height ratio.

It's important to note that while the waist-to-height ratio can be a useful tool, it is not the sole determinant of obesity or health. Other factors, such as body composition, muscle mass, and overall lifestyle, should also be taken into consideration. It's always a good idea to consult with a healthcare professional for a comprehensive assessment of your health.

What about Anorexia?

The waist-to-height ratio (WHtR) is generally not used as an indicator of anorexia. Anorexia nervosa is an eating disorder characterized by an intense fear of gaining weight, distorted body image, and extreme weight loss. While weight loss and low body weight are common features of anorexia, the WHtR is not typically used to diagnose or indicate this condition.

In diagnosing anorexia nervosa, healthcare professionals typically consider a range of factors, including body weight, body mass index (BMI), psychological symptoms, and other physical and behavioral indicators.

BMI is often used as a screening tool to assess weight status and potential health risks associated with weight, but it is important to note that BMI alone cannot provide a comprehensive diagnosis of anorexia or any other eating disorder.

If you or someone you know is concerned about anorexia or any other eating disorder, it is essential to seek professional help from a healthcare provider or a mental health specialist who can conduct a thorough evaluation and provide appropriate guidance and treatment.

8 Super Fun Exercises you can do by Yourself or with Family or Friends

Here are eight exercises that are a lot of fun to do by yourself or with family and friends:

  1. Archery: Archery is an engaging and enjoyable exercise that combines focus, coordination, and strength. It can be a great way to improve your upper body strength and concentration while having fun. Find a local archery range or club to get started or hire an archery instructor who teaches archery lessons.

  2. Dance Fitness: Dance fitness classes, such as Zumba or hip-hop dance workouts, are energetic and entertaining ways to get moving. You can enjoy the music, learn new dance moves, and burn calories in a social and supportive environment.

  3. Hiking: Explore the great outdoors and challenge yourself with hiking. It not only provides an opportunity to connect with nature but also offers a low-impact cardiovascular workout while strengthening your legs and core muscles. Choose trails that match your fitness level and enjoy the scenic views along the way.

  4. Trampoline Jumping: Jumping on a trampoline is not only a fun activity but also an effective cardiovascular exercise. It helps improve balance, coordination, and leg strength. You can try trampoline fitness classes or simply jump on a trampoline in your backyard or at a trampoline park.

  5. Martial Arts: Martial arts, such as karate, taekwondo, or kickboxing, are not only great for self-defense but also provide a total-body workout. They improve flexibility, strength, and mental focus while learning new techniques and engaging in dynamic movements.

  6. Indoor Rock Climbing: Indoor rock climbing is a thrilling activity that challenges your strength, endurance, and problem-solving skills. It engages your entire body, particularly your arms, core, and legs. Climbing with friends or joining a climbing gym can add a social aspect to this exciting exercise.

  7. Stand-Up Paddleboarding: Stand-up paddleboarding (SUP) combines balance, core strength, and paddling for a full-body workout. It's a fun way to enjoy the water and explore lakes, rivers, or the ocean. SUP can also be a tranquil and meditative activity.

  8. Jump Rope: Jumping rope is a versatile and enjoyable exercise that can be done almost anywhere. It improves cardiovascular fitness, coordination, and agility. You can try different jump rope techniques, create your own routines, or even participate in jump rope challenges with friends.

These exercises offer a mix of physical activity, entertainment, and opportunities for personal growth. Find the activities that you enjoy the most, and remember to choose exercises that match your fitness level.

6 Ways to Practice Boxing at Home

Here are six ways to practice boxing at home:

  1. Shadow Boxing: Shadow boxing is a fundamental exercise in boxing that can be easily practiced at home. Stand in front of a mirror or in an open space, and throw punches while focusing on technique, form, and footwork. Visualize an opponent and practice combinations, defensive moves, and footwork drills.

  2. Jump Rope: Jumping rope is a great cardiovascular exercise that boxers use to improve agility, footwork, and coordination. Grab a jump rope and start skipping. Challenge yourself with different skipping techniques, such as double unders or alternating foot jumps, to keep it challenging and fun.

  3. Heavy Bag Work: If you have access to a heavy bag at home, it's an excellent tool for practicing punches, power, and stamina. Put on your gloves, wrap your hands properly, and work on combinations, power punches, and defensive maneuvers. Focus on maintaining good form and control while hitting the bag.

  4. Speed Bag or Double-End Bag: If you have a speed bag or a double-end bag, these tools can help improve hand-eye coordination, speed, and rhythm. Practice hitting the speed bag or the double-end bag with quick and precise punches, focusing on timing and accuracy.

  5. Bodyweight Exercises: Strengthening your body is crucial for boxing. Incorporate bodyweight exercises into your routine to improve overall strength and conditioning. Include exercises like push-ups, squats, lunges, planks, burpees, and mountain climbers to target different muscle groups and enhance your boxing performance.

  6. Boxing Drills and Circuit Training: Create a circuit-style workout using a combination of boxing-specific exercises. For example, alternate between shadow boxing, jump rope, burpees, and high knees for a set time or number of repetitions. This type of circuit training helps simulate the intensity of a boxing match and improves endurance, power, and overall fitness.

Remember to warm up properly before engaging in any high-intensity exercises, and always prioritize safety. If you're new to boxing, consider seeking guidance from a boxing trainer or coach to ensure you learn proper techniques and reduce the risk of injury.

And if you're on a budget remember that you can just build your own equipment instead of buying the more expensive equipment.